Initial Setup How To Video:
System Requirements
- Requires stable WiFi connection or ethernet port access when used with the payment plug-in.
- Can be used with computers/phones/tablets/etc. with an internet connection.
- No driver software installation required.
Page Contents
Step 1: Boot up device
Step 2: Connecting to Network
- Enable WiFi/Ethernet Mode
- Select a Network
Step 3: Pairing to the payment plug-in
- Generate and Enter Pairing Code
- Unpairing the terminal
Step 4: Processing Transactions
Step 5: Important Information about the Device
- Switching Between WiFi Networks
- Switching the computer/browser
- Unpairing the terminal from computer/browser
- Unpairing the computer/broswer from terminal
For assistance with troubleshooting, please refer to the link below or contact CMS Support:
CMS Support
801.623.4000 option 2
Buttons/Functions
NOTE: The Vega3000 automatically runs required configuration updates that can take about 5 minutes to complete. When the updates are occurring, please allow the terminal to complete the updates before attempting to process transactions.
| Step 1: Boot up device |
Depending on the initial configuration of the device, your device may stall on the following screen instead of initially going to settings:

If your device goes to this screen, simply hold down the "9" key until you hear two beeps then release. You should then see the following:

Select "1" for Production, which will then lead you to the following screen:

| Step 2: Connect to Network |
Note: The Vega3000 has the option to connect to the internet by wifi or ethernet port connection.
Option 1: Enable Ethernet Mode
To enable Ethernet mode, simply select option 1 "Ethernet" and make sure that you connect the device to an available ethernet port. No other configuration is needed.
Option 2: Enable WiFi Mode
Select a Network
With WiFi mode enabled, the terminal should automatically detect available WiFi networks and display them as shown here:

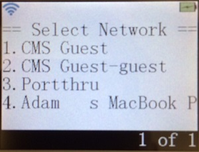
Select the WiFi network to be used and press the green enter button:
Enter the password for the network and click the green enter button. Repeatedly press a number on the keypad to cycle through upper and lower case letters listed on the key. Use the 0 key to cycle through symbols (such as !, $ etc). Selections will be entered after waiting for about one second. Press Enter when finished.
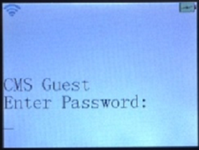
The terminal display will show the following once the terminal has connected to the network. If the Settings menu appears, simply press the Cancel button twice to exit the Settings menu and the Main Menu.
If the terminal has not yet been paired, you should see the following:
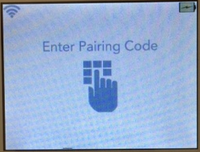
Once the terminal has been paired, you should see "Slyce" written across the screen. This means that the terminal is ready to process transactions.
Once the terminal has been connected to a WiFi network, it should automatically default to the selected network upon start-up. You should not have to re-enter the network password.
Switching Between WiFi Networks
To use a different network, you can either manually scan for the available networks, or you can choose to 'forget' the current network and let the terminal automatically scan for the available networks.
| Step 3: Pairing to the payment plug-in |
Generate and Enter Pairing Code
Open your Point of Sale access point:
- If using Slyce Gateway, click Quick Sale, enter an amount, and click Next.
- Click Chip in the payment plug-in.
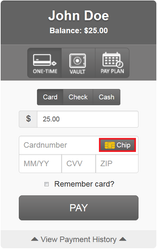
Enter the generated six digit pairing code into the terminal using the keypad.

Once the terminal is paired, the Swipe, Dip, or Tap screen will be displayed.
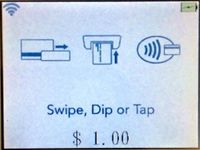
Continue the transaction following the instructions below: Processing Transactions
| Step 4: Processing Transactions |
Run transactions by swiping, dipping, or tapping cards using the terminal.
- Click Chip
- If not yet completed, enter the pairing code into the terminal (click here for pairing instructions)
- Continue transaction by following prompts on the terminal.
- Swipe, Dip, or Tap to process a transaction.
- Once the transaction is approved, click More Options to print or email the receipt.


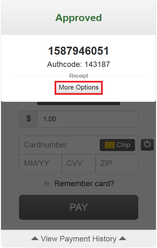
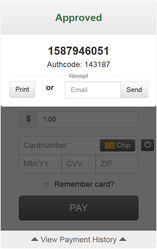
| Step 5: Things to know about the device |
Note: Your device uses a two way pairing system that stores a unique pairing code both in the device and in the computer/browser that you are using. If at any time your terminal or your computer/browser becomes disconnected you will need to repair both the terminal and the computer/browser.
Unpairing the terminal (from the computer/browser)
To unpair the terminal, click the unpair button pictured here:
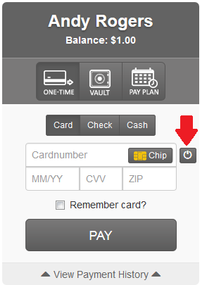
Click OK to unpair the terminal.
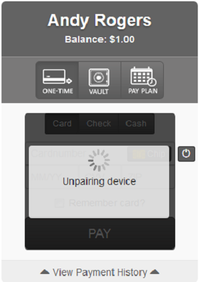
The plug-in will show the following before resetting to the screen with the Chip icon. Click Chip to begin pairing the terminal again.
![]()
If the above instructions do not work, you can manually unpair the terminal:
- Hold the down/Wi-Fi key until you hear a beep. This will bring up the Main Menu.
- Press ‘1’ to open the Settings.
- Press the down key.
- Press ‘1’ to unpair the terminal. Press the Enter button to unpair.
Unpairing the computer/browser from terminal
Press the "lock" symbol in the top left hand corner

Press "Remove" all your available cookies, this will delete the cookie that your old terminal pairing code is stored in
Rescan for Networks
- Hold down the WiFi key (the down arrow) until you hear the terminal beep, then release.
- Press 1 for Settings.
- Press 3 to Rescan WiFi networks. Note that pressing 3 will automatically forget the current network.
- Select the network to be used and enter the password as before.
Forget the Current Network
- Hold down the WiFi key (the down arrow) until you hear the terminal beep, then release.
- Press 1 for Settings.
- Press 2 to Manage WiFi networks.
- Select the network to be forgotten by pressing the corresponding number key
- Press 2 to Forget. This will disconnect the terminal from the current network.
- The terminal will automatically rescan for the available networks.
- Select the network to be used and enter the password as before.
Article ID: 36000104071


